Category Archives: Uncategorized

Shaping Up for Bowhunting

Getting in Shape for Backcountry Hunting

To succeed with today’s trophy bucks you need to start hunting where other hunters stop. The best hunters I know have no physical limits. They can get go anywhere the animals go, and then get the animal out after the shot.

If you want to spend more time hunting and less time recovering, you’ll need to put a pack on and literally run to the hills long before the season opens.

I won’t get into any specific work-out regimens here; just know that your regular work-out should include donning a heavy pack and doing some vertical hiking. In addition to cardio, a little weight training will do wonders to strengthen your back, legs, and core.

Cardio Training

Cardio training—aka high-endurance aerobics—is the best thing you can do to prepare for backcountry hunting. If your heart and lungs are sluggish, it won’t matter how big your biceps or quads are. Your cardiovascular system is what delivers necessary oxygen and nutrients to your muscles.

Any cardio-type exercise will help prepare you for the mountains, but if you’re planning an extreme pack-in hunt, you’ll need to change things up a bit. A daily jaunt on the treadmill won’t be enough.

For backcountry hunts I recommend starting a high-endurance aerobic exercise regimen at least two months in advance. Running, biking, swimming, and hiking are all good activities. Do at least one of these activities three times a week for a minimum of one hour.

You should get your heart rate up to 60-65 percent of your maximum heart rate, and then keep it there for at least one hour. If your goal is to become an “extreme wilderness athlete,” you’ll need to bump your heart-rate up to 70-85 percent of maximum heart rate, and then keep it there for a minimum of two hours.

Note: To figure out your “theoretic” maximum heart rate, simply subtract your age from 220. For example, if you are 30 years old, then your maximum heart rate is 190. To reach 85% of maximum heart rate, you simply multiply 190 by .85 (161.5 beats per minute). The only way to monitor your heart rate is with a fitness tracker. I use the cheap and effective Amazfit Band 5 Activity Fitness Tracker found on Amazon.

Again, it all depends on your style of hunting. If you’re sitting in a tree stand or ambushing a water hole, then you can get away with some pretty low-intensity training. A little jogging or cycling around the block a couple times a week would suffice.

Strength Training

After cardio, leg training should be your top priority. Your legs are the powerhouse of hiking and packing.

Trail running on uneven ground is an ideal exercise for your legs. In addition to intense cardio, running on uneven ground also strengthens the lower legs and joints. Like every joint in the body, the knees and ankles are surrounded by a vast network of tendons and muscles. Strengthening and tightening these joints also helps you to avoid injuries in the backcountry.

Trail running has the added benefit of preparing your body for high-altitude conditioning and endurance. This is especially important for low-landers since everything becomes more difficult with altitude.

Note:  If you are out of shape, trail running can be a very arduous workout. At the very least, you should begin with trail hiking, and work up from there. You’ll still get many of the same benefits of running.

Back and Core Muscles

Heavy packing relies on both your legs and your back. Dead-weight lifting and squats are the two best ways to condition your back and core.

In addition to weight training, hiking while wearing a heavy pack will help strengthen your back and core muscles. Taking extended scouting trips into the mountains is a great way to train while scouting for animals.

Conclusion

There’s no way around it; backcountry bowhunting requires you to be an athlete. Proper training for the backcountry means taking on a three-prong approach starting with cardio, then leg training, and finally back and core.

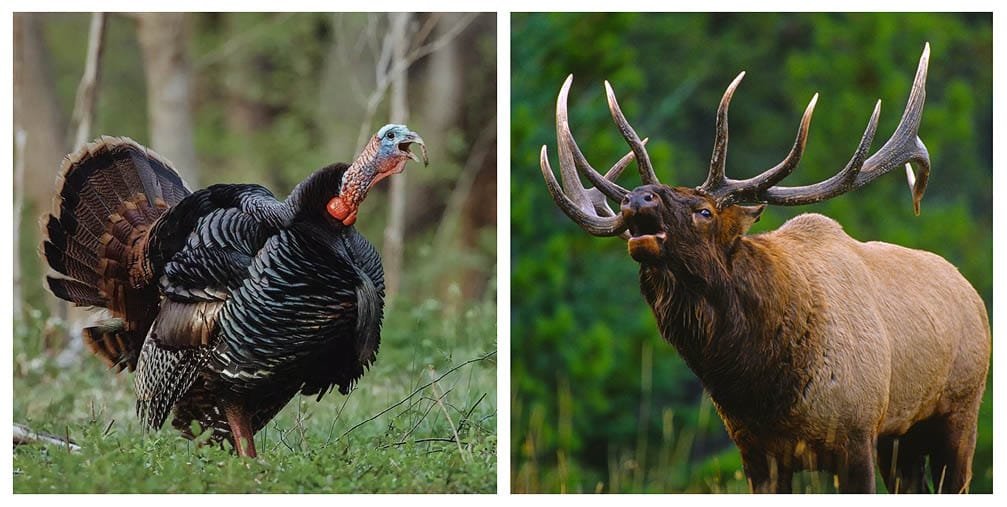
Turkey versus Elk Hunting: Similarities and Differences

Turkey vs. Elk

When I first started hunting turkeys, someone said they were very similar to elk. This sounded absurd considering the two animals are practically complete opposites. However, nine years later I have to admit that turkey behavior during the spring rut is very similar to elk behavior in the fall.

What this means is that any hunter transitioning from turkey to elk, or elk to turkey, will already have many of the necessary skills and knowledge to hunt the other creature.

In this article we’ll explore both the similarities and differences between the two animals.

Turkey and Elk Similarities

  1. Both animals have very loud calls (gobbles or bugles) that are used frequently to locate and communicate with other members of the herd. These calls are very useful for hunters trying to locate and call in animals. Also, both animals call more frequently in the morning and evening.
  2. In both cases, the flock or herd is led by a senior female, also known as a lead cow or hen. The bull or tom almost always pulls up the rear of the herd. This protects the tom or bull from threats and makes them more difficult to hunt.
  3. Both animals leave lots of sign and make lots of noise. Wherever turkeys or elk are living, they leave lots of tracks and droppings. This is key to locating the animals. Also, the both sexes of both animals make lots of noise or “flock talk:” Cows mew and chirp; hens yelp and cluck.
  4. Both elk and turkeys are difficult to drop with an arrow. In other words, your arrow must be perfectly placed in the vitals. Although turkeys are much smaller, they can really take a beating. Even a pass through shot can result in a lost bird if not placed in the 4-inch vital zone or head. As for elk, they are extremely tough. Even a single-lung hit can result in a lost animal.
  5. Both bulls and toms easily become call shy after just a couple bad experiences with hunters. Both animals are hunted hard out West and they learn fast. A call-shy or over-pressured animal might respond from afar, but they mostly hang up well out of bow range. If the hen or cow that you are trying to imitate isn’t willing to come to them, then the bull or tom will eventually lose interest and leave.
  6. Both animals use alarm barks or clucks when danger is detected. Turkeys immediately erupt into high-pitched alarm clucks when they see danger. Elk make sharp alarm barks. At this point the herd goes silent and moves off rapidly. In other words, it’s game over!
  7. Both elk and turkeys go silent during mid-day. Both animals feed heavily in the morning and go through their courting rituals before bedding down. Turkeys remain more day-active than elk—feeding and traveling around—but they are mostly silent. Elk just bed down and mostly sleep during the day. Then, in the last hour or two of light, both animals become loud and animated again.
  8. Both elk and turkeys are very exciting to hunt. A big bull elk is arguably more exciting, however, when you have a big tom strutting and gobbling into your decoy, it’s sure to get you riled up! Some elk hunters scoff at the idea that turkeys are exciting, but for the dedicated turkey hunter, it’s just as fun as elk hunting.

Now that we’ve examined the various similarities between elk and turkeys, let’s take a look at the major differences.

Turkey and Elk Differences

  1. Turkeys have excellent eyesight compared to elk. Elk can’t see colors in the red spectrum, nor can they see fine detail. Instead, they are forced to rely on scent or movement to detect danger. Turkeys on the other hand, being a bird, have extremely good eyesight. They see both color and fine detail. It’s also apparent that turkeys have a much faster frame-rate than mammals, which means they process visual information faster, and therefore see in slow motion. A hunter wearing camouflage and sitting still can easily be picked off at 30 yards by a turkey, where an elk won’t detect the hunter until he’s practically eyeball-to-eyeball.
  2. As mentioned before, elk rely on scent whereas turkeys don’t seem to use scent detection at all. This means a tom turkey can approach from any direction, but an elk must always be hunted with a favorable wind direction.
  3. Elk have a much larger kill zone than a turkey. The vital kill zone of an elk is almost the same size as an entire turkey (about 12 inches), whereas a turkey has a kill zone the size of a softball. Turkeys also move around a lot, which means they are much harder to hit with an arrow. Basically an archer needs to take his effective range (the distance where he can hit an 8-inch paper plate with every arrow) and divide it by two in order to be effective on turkeys.
  4. Elk leave much heavier blood trails and tracks than a turkey. A well-hit turkey can travel very long distances while leaving little to no sign to follow. Turkeys bleed very little and are nearly impossible to track without snow or mud. A poorly hit elk, on the other hand, will usually leave lots of blood and deep hoof tracks. Sure, elk are tough, but you can generally track them for much longer distances.
  5. There are far fewer turkeys than elk available to hunt. In Utah there are about 85,000 elk, but only 30,000 turkeys. That’s almost a 3-to-1 ratio. Although there is less demand for turkeys, you still might have a harder time locating turkeys.
  6. Aside from the major differences listed above, here are a few other differences:  a) Turkeys sleep during the night; elk sleep during the day, b) Turkeys have a much smaller home range compared to elk, and c) elk rut in the fall while turkeys rut in spring, mostly.

Conclusion

On the surface, turkeys and elk might seem like completely opposite animals. But hunting them can be very similar. Hopefully the above comparisons will help you transition between the two animals. The majestic bull elk are considered by most hunters to be the most exciting animal to pursue out West, but any dedicated turkey hunter will argue that the lowly thanksgiving bird ranks right up there with him.

Field Care: Quartering and Packing

Packing out a heavy mule deer.

Quartering and Packing

In the old days hunters often avoided hunting too far from roads simply because it would be too difficult to drag the animal out if they got one. A lot has changed since then. Today, backcountry hunters quarter or bone out their meat and then pack it out in a trip or two.

Quartering means removing the skin, all four quarters, the back-straps, and whatever other parts you wish to keep, including the ribs, neck meat, liver, heart, etc.

Boning means removing meat from the bones. Boning reduces pack weight by several pounds, but this method has its drawbacks. First, boning takes time to do it correctly. Secondly, it exposes even more meat to contamination from dirt, bugs, and hair. For this reason I advise against boning meat unless absolutely necessary.

Quartering and hanging an animal is much more sensible than gutting and dragging the animal out whole. A boned-out mule deer weighs about 90 pounds and can be packed out in a single trip if necessary.

An elk is about 3.5X larger than a deer. Boned or not, an elk will take two people several trips to pack it out. Whatever the case, just be sure you have an exit plan before launching an arrow.

The basics of quartering big game can be learned from numerous video tutorials found online. Then it’s just a matter of practice.

Quartering can be a daunting or even dangerous task when performed alone, especially on slippery or uneven terrain. Until you’ve gained some experience, try to enlist some help from fellow hunters for tasks like holding legs and hanging quarters. With a little practice, it can be accomplished alone.

Temperature and Spoilage

Heat is the number one concern with meat care. Bacteria grow  exponentially on a carcass if allowed to stay warm too long. Meat begins to spoil in temperatures above 40 degrees (fridge temperature). In 90-degree weather—which coincides with many archery seasons—meat can spoil in single a day.

The higher the ambient air temperature, the greater chance of spoilage. Ambient air temperature determines how much time you have to get quarters packed out and loaded into coolers.

When daytime temperatures are above 70 degrees, the animal should be packed out within 24 hours. If daytime temperatures are  below 50 degrees, you can take your time, even several days if needed.

Other than rapidly cooling your meat, there are a couple additional ways to extend meat freshness. First, there’s a company out there that makes anti-microbial game bags. These bags can help slow bacteria spread on the surface of the meat where most  contamintatin takes place. Second, when flies are an issue, simply rub black pepper all over the surface of the meat.

Quartering Tools

Be sure to carry the right tools for quartering your animal. This includes a very sharp hunting knife with a built-in gut hook, a lightweight folding bone saw, a knife sharpener, and a 4-pack of lightweight game bags.

My favorite knife for skinning is the Outdoor Edge Swingblade. The locking blade converts to a dedicated gutting knife. Besides gutting, this extra blade easily unzips the hide and cape without cutting too much hair.

Outdoor Edge Swingblade skinning knife and gutting blade.

Some hunters prefer razor knives with replaceable blades like the Havalon models. Havalons are extremely sharp and capable of breaking down even the largest animals. But they aren’t ideal for skinning as they can easily cut through the hide.

I personally carry a small surgeon’s scalpel with cheap replaceable blades and use it in conjunction with my skinning/gutting knife. The scalpel is especially useful for caping and removing the hide from delicate facial areas.

Lightweight surgeon’s scalpel w/ replaceable blades.

Cooling Your Meat

The first step in cooling meat is to open the chest cavity and use a stick to spread the rib cage apart. Next, skin the carcass as soon as possible. The hair and hide is very good at insulating and will hold heat for a long time. An elk carcass left with the hide on can spoil even when left lying on snow.

Skinning is best accomplished systematically as you remove quarters if you’re using the “gutless method.” (See YouTube for videos on the gutless method). In this fashion, the hide is left intact and spread out on the ground as a barrier between dirt and the meat.

Once quartered and bagged, hang the meat in the shade to cool. Either hang the quarters in a tree or prop them up on rocks, logs or bushes to increase air circulation. Even in hot weather, meat will cool rapidly in the shade and will extend pack-out time.

Whenever possible hang the meat in the bottom of a valley and/or near a stream to cool overnight.

You can further cool meat by placing pre-cooled quarters in plastic garbage bags and securing the bags in a stream or river. Just make sure the sun isn’t hitting the bags as they can heat up even when submerged.

Finally, consider packing the meat out at night as this can keep both you and your meat from overheating.

Once the meat is hung you will need to figure out how many pack-out trips it’s going to take. This depends on your physical conditioning, distance, and terrain. Try to figure out how much weight you can safely carry long distances before going afield.

When dealing with trophy animals, the head, antlers and hide will add significantly more weight. You can always remove the antlers and cape from the head in the field, but take extreme care. Without adequate caping experience you could easily damage or ruin your trophy cape.

Using Pack Animals

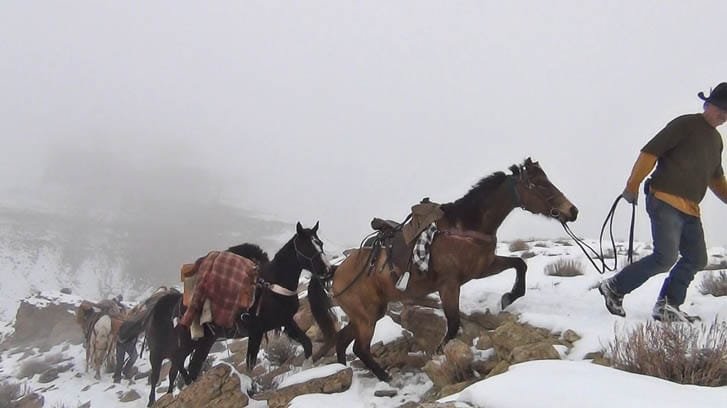
Whenever possible try to enlist a number of friends and/or pack animals for the job. With today’s lightweight frame packs there’s practically nothing you and a couple buddies can’t pack out given enough time. The problem with backcountry hunts is that you may not have enough time to get the animal out before it spoils. This is where pack animals come in handy.

For backcountry wilderness hunts, consider hiring a horse packer. My brother once harvested a 2000 pound bison at the bottom of a snowy chasm. Retrieving his once-in-a-lifetime animal was only made possible by hiring a horse packer. It costed several hundred dollars, but was well worth the expense.

Horse packers with bison.

Another option is renting llamas or pack goats. My brother has a string of pack goats that have proven invaluable for packing elk out of the backcountry.

Having a couple horses will open up the vast wilderness to more hunting opportunities. Legendary trophy hunters like Kirt Darner and Robby Denning frequently relied on horses, not only for access, but for getting their trophies out of the backcountry.

The biggest drawback to owning pack animals is the year-round expense and maintenance involved, not to mention the burden of caring for them afield. But in my opinion, these trade-offs are tolerable if it means consistent success on trophy bucks.

Conclusion

It’s much easier to spend a couple extra days packing a critter out of some hell hole than hunting easy-access country for weeks on end without success. You just need to have an exit plan. This means being in good enough shape for an arduous pack-out, or using pack animals for the task.

How to Choose a Taxidermist

How to Choose a Taxidermist

It’s often said that one should spend as much time researching taxidermists as they do researching their hunt. That’s because a taxidermy mount embodies the memory of your hunt for a lifetime. A quality mount is not cheap, but neither is your hunt. While your hunt will soon be over, the memories will remain. So isn’t it worth investing a little time and money in a quality mount? In this article I’ll guide you through the process of selecting a quality taxidermist.

Before we begin, I should mention that I’m a professional taxidermist living in Southern Utah. My business is Nate’s Taxidermy and I’ve been mounting big game animals for ten years. I’m not seeking to score more business with this article, but rather help fellow hunters figure out how to get professional quality mount.

One reason I became a taxidermist was the vast unprofessionalism I encountered in the industry before I became a taxidermist. Turnaround time was always delayed, craftsmanship was questionable, and professionalism was unheard of. Calls mostly went unanswered and any guarantee of quality was non-existent. With this in mind, here are my top suggestions for anyone searching for a taxidermist.

Quality of work

First off, visit as many taxidermy studios as possible. Every taxidermist should have a well-lit showroom with a variety of species to inspect. The goal of taxidermy is to bring the animal back to life…or close to. Do the specimens look “alive”?

Begin by asking what skills and methods separate them from their competition. When touring showrooms look for things like symmetry in the face, especially the eyes and ears. Watch for drumming (places where the skin has pulled free of the form). This usually occurs in highly detailed areas like the face, inside the ears, and around the legs. Drumming indicates low-quality glue or cutting corners.

Another place to inspect is antler bases. Make sure there aren’t any gaps or separations where the hair meets the horn. Also, take a close look at habitat bases. If you see something weird in your wanderings, ask about it. A real professional will be honest and friendly, and value you beyond the money you’re spending.

Turnaround Time

Unless you are in a big hurry with your mount, don’t base your decision solely on a fast turnaround time. That being said, your mount should be finished within a reasonable time, say 8 to 12 months. Good taxidermy takes some time, but not years.

Most high-volume taxidermists use commercial tanneries, which are better than in-house tanneries (in my opinion). But most commercial tanneries are currently 8 months out due to supply-chain and staffing issues. As of 2023 you can expect completion times can to be a little longer.

Once the hide is back from the tannery, it shouldn’t take more than a month or two to complete. If your taxidermist keeps extending the time he quoted, or making excuses—like blaming the tannery—then beware. A taxidermist who accepts too much workload is more likely to cut corners on your mount.

Quality of Materials

Most people would be hard-pressed to distinguish whether cheap materials and high quality ones were used in the final mount. But there is a difference. Just like a food recipe, the quality of the final product depends on the culmination of ingredients. It would behoove you to ask about various materials used.

Start with the tanning process. Was the hide professionally tanned, or just “dry preserved?” Dry preserved isn’t really tanning, and in my opinion should never be used since it will drastically decrease the shelf life of your mount.

Next is the glue (aka hide paste). Hide paste is what holds the whole mount together. There are a variety of glues on the market, but many taxidermists are still using dextrin-based glue simply because it’s very inexpensive. Dextrin works, but it’s also a food derivative (from corn starch) which can attract bugs. Modern synthetic glue is much better. Some glues even contain bug-resistant additives.

Synthetic glues are more expensive, but they’re necessary for the long term survival of your mount. So be sure to ask about the glue! There are many other materials used as well–things like eyes, ear liners, paint, etc—but most are visibly apparent. Basically, if the mount looks cheap, it probably is.

Professionalism and Paperwork

Anyone working in the dead animal business is gonna be a little strange (myself included). Still, no business can survive without some basic customer service skills. Why should taxidermy be any different?

Let’s start by answering the phone. Simple, right? Nope. I recently tried to call a fellow taxidermist for a month straight before giving up. Apparently it’s still a problem in our industry. If your taxidermist does answer the phone, is he courteous and helpful?

What about paperwork? In the past I was given a little, scribbled receipt showing little more than my deposit was paid. When I opened my own taxidermy business I started with the paperwork.

When a client brings me a project, they receive a signed agreement with various details including balance of account, turnaround time, guarantee of quality, desired mount position, and even measurements taken from the carcass. When they pick up their finished piece they receive a “care sheet” for the long-term maintenance of their mount.

Professionals should also have a decent website with updated photos, contact info, and other helpful information.

Clean and Orderly Workspace

When you visit the taxidermy shop, is it clean, orderly, and well lit? Or is dark, dingy, smelly and cluttered? Similar to a mechanic’s shop, working conditions often reflect in the quality of service. For example, taxidermy requires a myriad of specialized tools. How can a mount be done properly if the taxidermist can’t find the right tools?

Cleanliness is also vital in a shop. A sanitary workspace prevents insect infestations, as well as bacterial cross-contamination from one project to another. I once visited a shop with a huge bison skull rotting under a table. It smelled so bad I could hardly breathe. The taxidermist didn’t seem to notice, but it didn’t help my confidence any.

Specialization vs. Generalists

One of the first questions to ask a prospective taxidermist is which animals they specialize in. This can usually be discovered on their website, if they have one.

Some taxidermists are generalists while others are specialists. Some guys specialize in birds; others specialize in big game (myself included). There are also specialists in skulls, fish, African game, and small game.

A generalist does everything–fish, deer, skulls, etc. This is fine and dandy, but such a broad spectrum of work requires many more years of training and experience. African big game–which includes vastly more animals–is more specialized than North American big game and also requires more specialized training.

In the end, just make sure you’re not dropping a deer off at a fish guy with little experience in big game.

Experience and Training

Be sure to ask about experience and training. How many years has the taxidermist been in business? How many times has he mounted the specific animal you’re interested in? Where did he get his training from? Did he go to a specialized taxidermy school or was he trained as an assistant? Both are fine so long as he’s acquired the requisite foundation in his field of taxidermy.

Experience matters. Every animal and every animal manikin (form) is unique, and thus requires some level of customization. Only specialized training and experience will guarantee the accuracy of your mount.

Customer References

It’s a good idea to request a reference list of previous customer phone numbers from your prospective taxidermist. With a deer or duck you might be fine with just visiting his studio. But with an especially large or expensive mount (e.g. life-size grizzly bear, bison or musk ox) you’d be best making some calls.

A few key topics to discuss with past customers is turnaround time, customer service, and quality of their finished mount. I would also ask long-term customers how their mounts are holding up over the years, and whether or not they would use that taxidermist again.

Conclusion

That’s about it, folks. I know these are mostly common sense items, but you don’t want to take chances with your once-in-a-lifetime memories.

Taxidermy is as much an art as science. Science says your mount should accurately recreate the living creature. A good taxidermist will ‘bring the animal back to life.’

Art, on the other hand, is subjective. That’s where finding the right taxidermist with the right style comes into play. Style varies from artist to artist, so your goal should be to find the taxidermist who reflects both the “look” you desire and an accurate representation of your trophy.

Ode to My Bow

Ode to My Bow

My bow is my best friend and woods companion. It goes everywhere that I do, sometimes for weeks at a time. It hangs freely from my fingertips, never strapped to my back. It’s tough being my bow, constantly getting banged up and snagging on brush. Sometimes I break parts off of it, but it never complains or fails.

My bow has seen the most amazing things: Trophy bucks beyond imagination, breathtaking sunrises, the glowing Milky Way galaxy on a moonless night. It once protected me from a man-stalking cougar. Another time it was nearly struck by lightning as it hung from my hand during a freak thunderstorm. And yet another day, me and my bow were caught in a freak wind storm that blew down eleven trees into flying splinters around us with nowhere to run.Over the course of a year my bow gets soaked by rain, covered in dirt, and caked with snow. Despite the elements, my bow is 100% accurate with every shot. Whether it’s 100 degrees, or well below zero, my bow always shoots true. When an arrow misses the bullseye I only have myself to blame.

My bow is absolutely quiet, even when it snaps off an arrow at 300 feet per second. A deer might hear the arrow whiz by, but not the whisper of the bows release.

At first glance my bow looks like any other aluminum-framed, modern compound bow. But it’s not. My bow was designed by a certifiable genius-engineer by the name of Mathew McPherson. Since the 1990s, McPherson has led the charge in bow technology, quite literally reinventing the modern compound bow over and over again.

The name stamped on my bow is Halon 32. Halon is a fire-extinguisher gas and a strange name for a bow. Its actual name—the one I gave it—is “Excalibur III”.

Excalibur III is my third serious hunting bow. But in the end it’s still only a tool, and so I usually just call it, well, “My Bow.”

Since 2017 my bow has killed three P&Y deer, one trophy mountain goat, three javelina and several non-trophy animals. It’s the primary provider of meat for me and my family.

Shortly after returning home from a long hunt, I feel an emptiness by my side, like I’m forgetting something. Then I realize it’s my bow, now tucked snuggly away in its case on the floor behind the couch.

Out of sight, but never out of mind, my bow is a warrior and a friend. With my bow, alone, I share life’s greatest moments; my pain, my success, my tears and my glory.

Best Foods for Hunting and Backpacking

Best Foods for the Backcountry

Napoleon once said, “An army travels on its stomach.” This certainly applies to hunters too. Hunting the Rocky Mountains is the most physically demanding thing many of us do each year, requiring nearly double your normal daily caloric intake. But finding the right foods with regards to nutrition while reducing weight can be a challenge.

Everyone has their own tastes when it comes to field food, but what we can all agree on is backcountry hunters need a steady diet of protein to build muscle in conjunction with a regular intake of carbohydrates for continual energy. In big buck country you’ll need plenty of both.

Prepare for the Worst

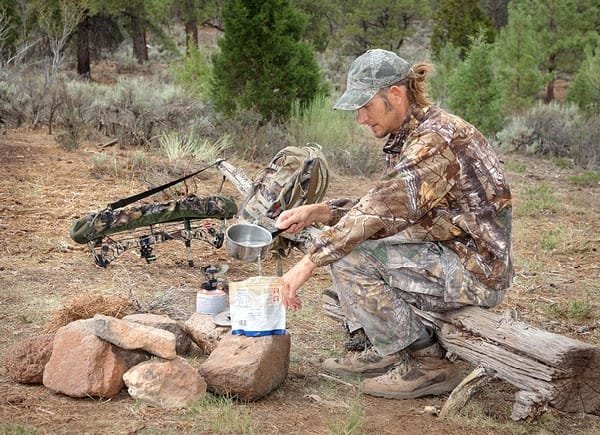
First off, carrying enough food is far more important than trying to save weight by bringing too little.  This is especially important in cold weather because you’ll burn far more calories trying to stay warm. I’ve been chased off the snowy mountain before from lack of food, and it’s a lousy excuse for failure. Fortunately we live in the era of an abundant supply of pre-packaged, freeze-dried meals that take up little space and weigh practically nothing. Just add water.

Pre-Packaged Meals

On backcountry trips where weight is crucial, your best option is pre-packaged dehydrated meals like Mountain House. When choosing pre-packaged meals be sure to choose the highest protein content since most lack adequate protein for some dumb reason. For this reason I augment my pre-packed meals with precooked tuna and/or chicken pouches. Add them directly to the meal or eat  it separately.

Note:  Most freeze-dried meals can cost a pretty penny. Fortunately you can save about 25% by purchasing the  #10 size can (10 serving size). Then use a vacuum sealer to create customized portions for your trip.

Carbs for Energy

You’ll get plenty of carbs from your Mt. House meals in the form of pasta or rice. Whenever possible you should avoid fast-burn, sugary foods such as candy, soda, white bread or crackers. Instead, reach for slow-burning carbs that will last all day and won’t burn you out. These include granola, oats (oatmeal or bars), beans, and whole-grain bread & snack bars.

Trail Snacks

For trail snacks in your daypack I recommend dried fruits, nuts, jerky (venison or beef), cereal bars, and boiled eggs. Dried fruit has plenty of natural carbs, plus much-needed fiber. Adequate fiber will further help you reduce weight in the field…for obvious reasons.

I always choose a variety of dried fruits with plenty of bananas. Bananas are a good source of potassium, magnesium, and calcium, three nutrients that help to ease muscle cramps.

Beautiful Boiled Eggs

Boiled eggs are a wonderful, high-protein, pre-wrapped food for both snacks and meals. I could live for weeks on boiled eggs alone, even without salt. The only drawback to eggs is they are relatively heavy and prone to freezing. Eggs are also perishable in warm weather so you’ll need a way to keep them cool. If possible store them in a small cooler, a stream, or snowpack. If eggs aren’t your thing, I recommend jerky or peanut butter for high-protein snacking.

Comfort Food

Other than nourishment of the body, food serves another purpose: nourishment of the soul. After a few rough days afield you’ll likely suffer some level of mental fatigue bordering on a breakdown. Hunger only exacerbates the problem. Therefore I recommend a small amount of comfort food (aka junk food), whether it’s a bag of Doritos, Snicker bars, or couple cans of Coke. This will cheer up your inner child and just might keep you on the mountain long enough to get the job done. Just take it easy on the snacking or you’ll just burn yourself out. Think “Emergency use only!”

Conclusion

Having enough good, nutritious food will do wonders for the hunter’s mind and body. Just remember, you’re not going to the mountain for a picnic, so keep it lightweight and simple. If things get really bad, you can always shoot an animal and eat that. We are hunters, after all!

Did I miss anything?  Let me know what you like to eat at 10,000 feet.

All the Fish in Utah: A Reel Life Goal

21-pound brown trout taken in 2012 from Causey Reservoir, Utah.

Preface:  Yeah, I know this is a bowhunting blog, but fishing is hunting–underwater hunting to be exact–and many of the same hunting concepts apply.

Every Fish in Utah

Way back before video games and cell phones, when I was a little kid growing up in Northern Utah, we farm kids wiled away our time in the outdoors. Some of my earliest memories were time spent trout fishing with my  family. My love for fishing continued strong into my teenage years and pretty soon I was dodging work to go fishing any time I could.

It wasn’t long before I began exploring new waters with exciting, new fish species ranging from bass, to sunfish, and weird stuff like arctic grayling and tiger musky. I guess variety truly is the spice of life because I loved catching a new fish way more than the same old boring trout.

Somewhere along my angling path I picked up a DWR fish regulation booklet in which was printed dozens of full color fish pictures. I was pleasantly surprised at just how many fish species we had living in Utah, due primarily to the wide range of temperatures and elevations this state affords. In a nanosecond I decided to catch every single fish before I died; it was my life’s goal. As an aside, I had no interest in catching the wide variety of trash fish (carp, suckers, and chubs) so I left them out.

Throughout my troublesome twenties, I systematically checked off fish after fish. It was quite the adventure. Some fish, like the white bass, pike, and tiger musky, existed in only one or two lakes, which forced me to make several surgical strikes along the way. Not only did I end up exploring countless new waters, but I was learning all about specific fish behaviors and special techniques for catching them. I talked to dozens of fish shop owners and DWR officers over the years and found the whole process to be fascinating.

Only Five to Go

As I neared my thirties, my list of remaining species had shrunk to only five species: walleye, whitefish, striped bass, and northern pike. This is where things got complicated. The DWR, in their infinite wisdom and biological prowess, began cross-breeding several species to produce entirely new species of sterile hybrids. These included tiger trout, splake, and wiper bass. It seemed that every time I crossed a fish off my list, they added a new one. It was frustrating, but fun!

The tiger trout was the craziest fish I ever met. The first one I hooked actually took of “running,” or skipping, across the lake surface. I lost several before finally landing one. There’s something about crossing a brown trout with a brook trout that brings out the crazy.

Tiger trout from Birch Creek Reservoir.

The toughest fish was the elusive walleye. This silver-eyed, nocturnal bottom-hunter exists in just a few Utah lakes, the closest being Willard Bay. For five long years I researched walleye, bought piles of walleye-specific lures, and beat the waters to death trying to catch one. I fantasized about punching the walleye in the snout if I ever did catch one. Finally, one cool and dark evening on the shores of Willard bay in 2000, I landed an 18-incher on a white curly tail jig. I didn’t punch it, but made a delicious walleye dinner instead.

Finally, a walleye! Willard Bay, 2000.

The whitefish–an ugly, bottom-feeding fish resembling a cross between a trout and a carp–fell next to my fly rod on the Weber River. One freezing, winter afternoon I bounced a nymph along the bottom and BOOM, caught and photographed a whitefish, then tossed it back. Only two fish left!

The Lowly Burbot

Nope, make that three…  Around this time, some ass-clown, bucket-biologist tossed a ling cod (aka burbot) into Flaming Gorge and it just took off. This ugly fish, which resembles a cross between a snake and a living turd, exploded in the vast waters of the Gorge and now threatens to wreck the entire fishery. Nonetheless, it was placed on my hit list. In the winter of 2011 I signed up for the Burbot Bash Fish Derby and caught an ugly burbot the first night out. I almost didn’t want to touch it, but man was it delicious!

Ling cod (burbot) from Flaming Gorge, 2011.

Only Two Left

In spring of 2011 I made a solo trip 400 miles to Lake Powell to target striped bass from shore. I’d amassed a huge pile of striper data over the years…none of which really helped me, that is, except for chumming. Shad lures were the purported ticket: buy a bunch of white and silver lures and throw ’em till you catch a striper. I chummed the water with a pile of cut-up shad pieces and then casted and reeled and casted and reeled to no avail.

My secret weapon. DO NOT SHARE! ;>)

An hour later, with nary a bite, I was rummaging desperately through my tackle box when I spotted my secret weapon: a 4-inch, green tube jig with red flakes. This unsuspecting lure had caught more fish than any lure I own. In no time I was fighting a big ‘ol striper bass to shore…and then 12 more! Amazing! Only one more fish to go: the northern pike.

My first striped bass. Lake Powell, 2011.

Pike occur in abundance at Yuba Lake in Central Utah, which just happened to be on my way home from Powell. Could I actually do it???

Nope. Runoff was high that year, and the lake was flooded and freezing cold. I wandered all over the limited public access shoreline while tossing everything I had into the water to no avail. Then I went home empty-handed.

2012 was a great year, not because the world didn’t end, but rather I got several days off with my wife for a second round at the northern pike. My goal was simple: Fish all day, every day, and NEVER come home till I’d accomplished my life’s goal.

It was a warm and calm day, the 22nd of May, 2012. We loaded the old green canoe on the roof of my truck and headed south. (NOTE: You definitely need a boat when fishing Yuba. A canoe will work.) We canoed around while tossing spinners into likely pike areas…I think…though I’d never actually seen a pike in reel life. ANYHOO, I got good tug, set the hook, and reeled in a small pike, but a pike nonetheless.

Mission Accompished

I was ecstatic! Well, I was ecstatic for about 2 minutes. After taking pictures however, a deep emptiness set in. It caught me off guard. All I could think was, “Now what!?” I guess I didn’t believe it would actually happen. Now what?

Mission accomplished!!! Northern pike at Yuba Reservoir, 2012.

After 30 years, I’d fallen in love with the chase even more than the fish. Each new species was an exciting new adventure. Countless nights I’d stayed up late studying fish behavior and learning new tactics. Each new fish was accompanied by an adrenaline surge and a great sense of accomplishment. And now it was over.

Such is life.

Now What?

I have since set newer, bigger outdoor goals. I probably won’t live long enough to reach them all, but I now understand that it’s the pursuit I love most. Moreover, it’s the people who support your goals and accompany you on your crazy adventures. (Special thanks to my wife, Esther, who supported me whole-hardheartedly through my mad, mad life.)

Without goals we flounder through life and get lazy. Mediocrity sets in. Give me adventure, give me passion, give me conquest, or give me death!

Conclusion – The Art of Zen Fishing

The most valuable single piece of information I gained from my quest is fish Zen. No matter where I fish, I can pretty quickly get a feel for when, where, and what the fish are biting on. As my lure moves through the water I can almost visualize where the fish are and how they’ll respond to it. Infinite knowledge and experience is archived in my subconscious and conscious mind. I make my next cast and retrieve based not on speculation, but infinite data points, some of which I’m not even conscious of. What does it all mean? I’ll never starve. There’s a simple, primal, and invaluable confidence in knowing that you’ll never starve.

Now It’s Your Turn

Now it’s your turn, if you so desire. Utah has 30 game fish species strewn all over the state, and I’ve never met another person who’s caught them all. Close, maybe. So why not try it yourself! Send me any questions you may have and I’ll be glad to help you out. Truthfully, I’m sitting on way too much fishing information to just take it to my grave.

Happy Fishing!

Stop-Rot: Saving Your Hide!

What is Stop-Rot and why do I need it?

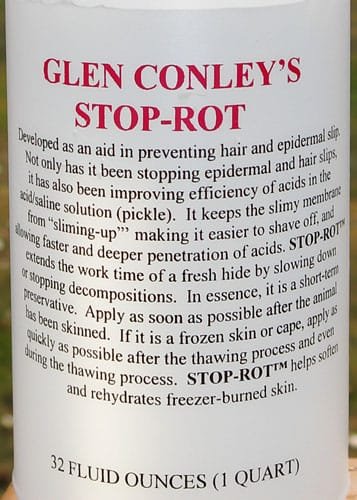
Stop-Rot is an anti-bacterial liquid preservative that “extends the work time of a fresh hide by slowing down or stopping decomposition,” thus saving your trophy hide from decay and hair loss.

Stop-Rot was developed by taxidermist/chemist, Glen Conley, specifically for saving hides from hair slippage ahead of the tanning process. It has been used widely in the taxidermy industry for many years, and now hunters are starting to use it too.

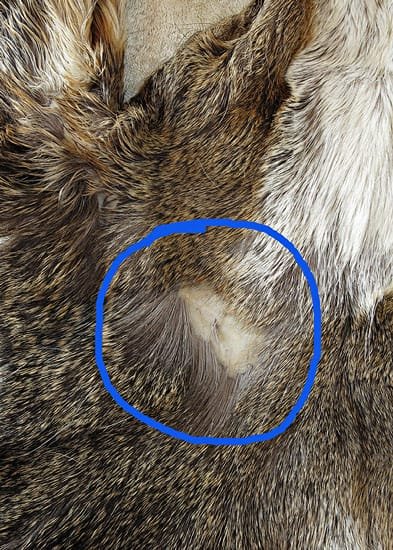
After killing your trophy animal, bacteria immedately begins to multiply all over the animal, especially around wet and bloody areas. In a relatively short period of time, bacteria begins to attack the skin and and hair follicles, thus leading to hair slippage and a ruined hide. A good taxidermist can fix almost anything, but very little can be done to save a hide with hair falling out.

Hair Slippage: This hide was ruined by bacteria before it even arrived at my shop.

Because bacteria thrives in warm temperatures, Stop-Rot is especially useful during early-season hunts that occur in August and September. Traditionally salt was used to preserve hides afield. However, salt dries out the hide and makes it virtually impossible to flesh properly before going into the tanning process.

How to Use Stop-Rot

Stop-Rot can be used on both the flesh side of the hide and the hair side. The instructions say to “apply Stop-Rot as soon as possible after the animal has been skinned.” For this reason I always keep a bottle of Stop-Rot back at camp. I’ll spray it on any bloody spots or short-haired areas like the face and ears. I just spray it on and massage it in. Be sure to spray a light coating over the entire flesh side of the hide.

Applying stop-rot to a freshly-skinned hide.
Apply Stop-Rot to facial areas including eyes, ears, mouth, and nose.

Where Can I Buy Stop-Rot?

Stop-Rot costs around $23 a quart and is only available through taxidermy supply companies like Van Dykes or Trufitt. To avoid paying shipping, request a bottle from your taxidermist. If you live it Utah, you can buy Stop-Rot at Trufitt’s taxidermy supply store at 1744 South Redwood in Salt Lake City. In Southern Utah you can get it directly from me. I never go hunting without this product.

Conclusion

Stop-Rot should be used when hunting in warm conditions or any time you can’t get your hide to a freezer or taxidermist in a timely manner. Although I’m constantly touting the benefits of Stop-Rot, I don’t receive any sort of commissions from it. My taxidermy business, however, relies on usable hides. More importantly is the preservation of your hard-won trophy.

Stop-Rot: Use it or lose it!

9 Surprising Facts About Mule Deer

9 Surprising Facts About Mule Deer

With the Utah archery deer hunt only a week away, I’ve been thinking a lot about mule deer, particularly their behavior and ecology. In reflecting on past hunts, I’ve come to realize that the biggest factor contributing to hunting success is having an intimate knowledge of your prey, whatever animal it happens to be. By learning your prey, you can more accurately dissect the mountain and predict their locations and movements.

I really love mule deer. Not only are they exciting to hunt, but these brilliant survivors are endlessly fascinating to observe in the wild. I’ve read just about every book and article written on mule deer and have kept careful notes along the way. Today I’d like to share some of the most surprising facts I’ve learned about mule deer.

Surprising Mule Deer Facts

1. In 1900 there were only 10,000 deer living in Utah; today there are more than 350,000! The main factors contributing to herd growth is better resource management, relatively mild weather in recent times, and an increase in predator control efforts. Considering that only 30% of today’s hunters are successful in bagging a buck each year, it’s surprising how many deer there really are out there.

2. Before 1950 half the bucks harvested in Utah were mature (3.5 years and older). Today only 10% of bucks harvested are mature. This is obviously the result of “quantity over quality” management, coupled with high demand for tags and the resource manager’s desire to maximize permit sales. For the trophy hunter you’ll have to sift through lots of deer to find a true trophy. In Utah only about 1 in 56,000 bucks harvested will make Boone & Crockett.

3. Using their sensitive snouts, deer can detect water up to two feet below ground and then use their hooves to dig it up. During hunting season water isn’t a concern unless it’s really hot and dry, in which case the deer must drink once a day. Because it’s so dangerous to travel to water, the deer will often sniff it out. The deer’s nose is estimated to be 1000 times more sensitive than humans. They also use their incredible sense of smell to find best food sources, find mates, and of course to sniff out predators like ourselves.

4. Deer have a 310-degree field of view, as compared to humans who see less than a 180 degrees. Not only can the deer see 86% of it’s surroundings, but he has amazing night vision and motion detection. For all of these strengths, however, it sacrifices the ability to see colors in the red spectrum and fine details.

5. Most big bucks are “hiders,” as opposed to “runners,” when encountered in high-pressured areas. If you typically hunt in dense cover, chances are you’ve been seen by far more deer than you think. The bucks that run are either small or know they’ve been spotted.

6. Mule deer antler growth exceeds two inches per week during spring and summer, and then greatly declines the first week of August. Final antler size is largely determined by three factors: age, genetics, and available forage. A wet spring and/or early monsoon season is your best chance to harvest a trophy buck.

7. The unusual form of bounding (called stotting) where all four legs leave the ground simultaneously, is unique to mule deer and was adapted to escape cougars in mountainous terrain. No other big game species in North America uses this unusual mode of locomotion. Not only is stotting useful for navigating heavy cover, but is done quickly, covering 22 to 29 feet with each bound on level ground.

8. The average home range for a deer is only .6 square miles. Since deer don’t like to wander outside their home range, it might seem easy for us hunters to locate a buck. The problem is that deer are highly adaptable to human pressure and will quickly evacuate the mountain to predetermined safe zone, sometimes miles away from it’s home range.

9. Elk compete directly with mule deer, especially on winter ranges. Although elk are 3.5 times bigger than a deer, biologists estimate that one elk is the equivalent of 5-8 deer in terms of winter range degradation. In areas where both elk and deer populations are high, elk will gradually replace the mule deer. The greatest long-term threat to mule deer, however, is the natural reintroduction of the whitetail deer which will likely force the mule deer into extinction! Enjoy the great muley while you can.

Fascinating creatures, aren’t they?! I hope you enjoyed these facts.