Part 1: Overcoming Adversity

Part 1 of a 4 part series on life, hunting, and overcoming adversity.

Silhouette2

Adverse Conditions = Success

In teaching advanced archery, one of my lessons revolves around “adverse conditions.” What I mean by adverse conditions is that when you’re shooting arrows in your backyard, you are generally shooting at a large target, on a flat surface, at a known yardage, and in fair weather.

Practice for Adverse Conditions

Big bucks are tough and can take an arrow when hit poorly. Believe me, there’s nothing worse than injuring or losing buck following a bad hit. If it hasn’t happened to you yet, it will. It’s been said that there are two kinds of motorcycle riders: those who’ve gone down and those who will. The same thing applies to bowhunters. Every situation is different and nothing is ever perfect. Success often depends on how fast you can load, draw, and shoot under tremendous pressure inside a buck’s 60-yard security bubble.

Fortunately we can put off the inevitable doing what I call “adverse conditions” practice. Adverse conditions practice means shooting from random distances, from various body positions, around objects, and in less-than-ideal conditions like wind or low light.

To optimize each shooting session—and to add some fun—try the following routine when shooting with a partner. Have him or her pick a random spot to shoot from. Shoot one arrow each without ranging. Then range the distance and shoot a second arrow. Take turns selecting different spots to shoot from while making each shot as difficult as possible by placing mental and physical obstacles between you and the target. Shoot from behind objects like trees, or through light brush or grass.

In the woods you will deal with all kinds of physical distractions, like shaking from the cold or buck fever, or maybe sweat dripping in your eyes and flies landing on your face. You can prepare for these situations by having your shooting partner yell or poke you right before the shot. Don’t let your partner shoot until after you yell, “There’s a deer! He’s coming right for us!” You can further add intensity to these sessions by keeping score, or better yet, putting money on each shot. In the old days we would pin a dollar bills to the target, and whoever hit a bill got to keep it.

In real life hunting scenarios, animals move around a lot. Yet archers rarely practice shooting at moving targets. Instead we get accustom to settling the pin on stationary block targets. Shooting at running animals isn’t really practical or ethical. Even when an animal is walking slowly it’s a good idea to try and stop it. That being said, animals are unpredictable. Sometimes they take a step during a shot. Other times you won’t be able to stop them no matter what you do. Consequently, a hunter who only shoots at stationary targets will likely hit the animal too far back. Fortunately you can prepare for these situations by shooting moving targets.

Shooting at slow-moving targets will mimic real-life hunting situations. Your best bet is to find (or build) a round target and roll it down a gently-sloping hill. If you don’t have a rolling target you can always put a square target in a wagon and have someone pull it with a rope. Another option is to dangle a small balloon from a string in front of a large target or backstop. You might be surprised at how difficult it is to hit a balloon dancing in the wind.

Practicing for real-life hunting scenarios also means shooting form different body positions. Shooting from a standing position might be fine for sighting in your bow, but pretty soon you’d better get on your knees. Not only are deer more likely to identify you as a person when you are standing, but most stalks and shots take place on your knees. Most of my bucks were taken from a kneeling position. They were also taken while wearing a backpack, a ball cap, and a camouflage glove on my bow hand. So that’s how I practice. During every practice sessions, purposely contort, twist, or lean your body like you would in a real-life hunting situation. It’s also a good idea to practice shooting steep up and down angles.

Bowhunters are lucky to get one or two shots at deer each season, so it’s imperative that we practice for real-life hunting scenarios. Rarely will you find a buck standing perfectly broadside on flat ground at a known distance. Unless the buck is bedded, he will likely be moving, and possibly in heavy cover. Anything you can do to make archery practice more challenging will translate into better success in the field.

Remember, overcoming adversity is how we grow stronger in life and bowhunting. Anticipate it–even welcome it–and you’ll be better for it.

Click here for Part 2:  The Steely Claws

Step #2: Gripping the Bow

How to Grip the Bow

The bow arm (or bow hand) is the arm that holds the bow up. It is sometimes referred to as a dead-post because it doesn’t really do anything special, other than hold the bow. That being said, your bow arm has a great effect on accuracy. This applies to both traditional and modern bows.

Bow arm grip.

Steps to Properly Grip the Bow

1.  If you are right-handed, grip the bow with your left hand. First off, you’re not really “gripping” the bow, you’re simply holding the bow and pushing it forward as you draw back. If you grip the bow too tightly you’ll torque it from side to side, causing you to miss left or right.

The best way to avoid torque is to lightly touch the tips of your thumb and index finger together and allow your other fingers to remain relaxed.

Use a loose grip on the bow to avoid torque.

2.  The bow’s grip should settle in the “throat” or “V” of your hand (between your thumb and index finger.) The grip should also line up just to the thumb side of your “life line.” In other words, the bow is supported by the big, fleshy part of your lower thumb.

For maximum support, keep your wrist straight and in-line with your forearm bones (as seen in the photo above). If you allow your wrist to bend outward it will cause the bow to settle at the base of your thumb, which causes movement. As you relax your grip on the bow, you will feel the bow settle at a balanced fulcrum point in the throat of your hand.

Correct wrist alignment.
Incorrect wrist alignment.

3. The most common mistake for beginner archers is to allow the elbow to bend downward. This increases the chance of slapping your arm with the string. Therefore, you must draw with your elbow up and bent slightly outward.

Elbow up and bent slightly outward (CORRECT).
Elbow pointed downward (INCORRECT).

4. As you draw the bow back, your bow arm pushes the bow forward. Remember, your back muscles are doing all the work. As you squeeze your shoulder blades together, your bow arm and your shooting arm apply pressure in opposite directions. This is called “pulling the bow apart.”

On the shot, both arms continue in opposite directions. This is called “follow through” and will be covered in a future post.

Click here for Step #3: The Release Arm

Step #1: Proper Archery Shooting Stance

Archery Shooting Stance

Proper archery shooting form is the foundation for accuracy. Over the next few weeks we will cover proper archery shooting form, literally from the ground up.

Believe it or not, proper form has more influence on accuracy than aiming! Therefore, we will start with your feet and end with your eyes. Always remember, archery is executed by drawing the bow string across your chest and not towards it. Therefore, your body must face 90-degrees away from the target. This is accomplished with proper foot placement.

Feet Placement Steps:

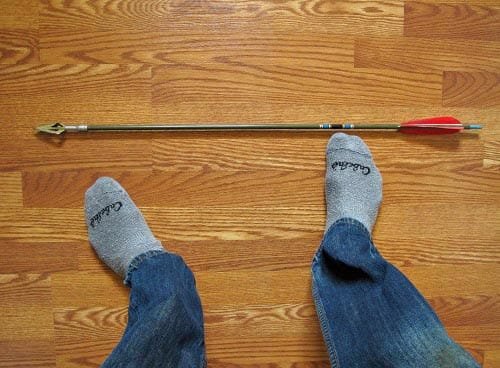
  1. Place an arrow on the ground, pointed at the target.
  2. Line up your feet perpendicular to the arrow so your toes are almost touching it. You are now standing at a 90-degree angle to the target. (see photo below)

stance001

3.  Space your feet shoulder-width apart.

4. If you are right-handed, move your left foot (foot closest to the target) back 3 or 4 inches from the arrow and pointed halfway–or 45 degrees–towards the target. (see photo below)stance002

5.  You are now in the proper archery shooting stance. It’s that easy!

Before you even nock an arrow be sure your feet are set properly. A proper shooting stance provides a stable body position for shooting any kind of bow. It also opens up the space in front of your chest to draw the bowstring.

Any deviation from this stance will put you off balance and adversely affect shot accuracy.  This will quickly become a good habit.

For the next lesson, click here: Step #2: Gripping the Bow

Adverse Conditions = Success

Silhouette2

Adverse Conditions = Success

In teaching advanced archery, one of my lessons revolves around “adverse conditions” training. What I mean by adverse conditions is that when you’re shooting arrows in your backyard you are generally shooting at a large target over flat terrain, at a known yardage and in fair weather.

But the inexperienced bowhunter soon realizes that the mountains are very different than practicing at home.

In a real-life hunting scenario you often find yourself shooting from a kneeling position, up or down steep hills, through brush or limbs, at unknown distances, with a fly buzzing around your face and aiming into the sun.

It’s no wonder bowhunters have such low success rates!

In the real world, whether fighting the mountain or fighting the rat race of life, we are constantly battling adverse conditions. Therefore we must practice shooting through adversity in order to become better and stronger at whatever we’re doing.

Adverse Conditions Training

The secret to successful bowhunting is to practice in adverse conditions. This means placing as many mental and physical obstacles between you and the target. The following are some ways to practice for adverse conditions.

Have your shooting partner yell or poke you right before you shoot. Shoot at unknown distances. Shoot with a strong crosswind. Shoot through heavy cover or around obstacles. Do whatever you can do to make practice harder and it will pay off in the woods.

Through many years of real-life hunting experience, I’ve learned that the biggest obstacle is yourself. Even if you shoot 10,000 arrows in the preseason, you’re never really ready when that buck-of-a-lifetime steps out in front of you. When it happens you’ll likely come unglued!

My brother, Russell, relates a story form years ago when he was still new to bowhunting. A small, two-point buck stepped out fifteen years in front of him. Sure enough he panicked and sent his arrow plowing into the dirt at the buck’s feet!

How does one prepare for that kind of pressure? The following are the best ways I’ve found to practice for high-pressure shooting situations:

  1. Don’t shoot square targets. Instead, shoot realistic 3D targets. If you don’t have a 3D target you can always dangle small balloons from a string in front of your target. You might be surprised at how difficult it is to hit a balloon as it dances in the wind. Not only will this prepare you for realistic situations, but it’s a lot of fun.
  2. Compete! At least once or twice a year, sign up for a 3D tournament, even if you aren’t that good. Competitions–especially ones with lots of money on the line–always raise adrenaline levels. If you aren’t up for a formal competition, you can create competitions by practicing with a couple friends. Put a couple bucks on the line and watch the competition soar.
  3. Sprint to and from your target to get your heart rate up, shoot quickly, and repeat. I admit, this isn’t a fun way to practice, but it sure helps.

Remember, overcoming adversity is how we grow stronger in both life and bowhunting. Anticipate adversity–even welcome it–and you’ll be stronger for it.

What are you doing to make practice more challenging?

Zen Bowhunter Blog: Maiden Voyage


Silhouette1

My New Zen Bowhunting Blog

It’s happening early this year! That hunter instinct is creeping in, and the bowhunt is still two months away. I guess it’s just been on my mind…

…hence my new bowhunting BLOG.

Welcome everyone to my new Zen Bow Hunter blog. The purpose of this blog is not to sell anything, but to help people, bowhunters and Zen seekers alike. With these blogs I wish to share my experience and expertise in the field of archery, bowhunting and Zen.

At this point you might be asking, “What the heck is Zen hunting?

Basically Zen is an Eastern philosophy of increasing awareness and achieving a oneness with the universe. Through Zen meditation a person is able to channel great insights and creative powers directly from the Infinite Source.

Zen isn’t so much a religion as a way of life. Zen is associated with the sixth sense which allows a subtle command of physical elements and a power outside the normal human capacities.

Zen hunting is simply the application of Zen to hunting, just as Zen can be applied to anything else you do, ranging from gardening to swordsmanship.

My Qualifications

Your next question might be, “What qualifies this blogger to write on such subjects as Zen and bowhunting?”

Simply put, I’ve been an avid bowhunter since 1996, and over the course of these past 18 years I have found my own personal Zen via regular trips alone into nature. In just the last five years I have arrowed three Pope & Young trophy animals, all within 20 yards, and all with very little effort on my part. Throughout this period I realized that Zen is a process of yielding oneself, or one’s ego, to a higher power.

As the years pile up behind me, I’m beginning to realize that the natural progression of life is first, to explore ones passions, second, to master the things you’re passionate about, and finally, to share this accumulated knowledge with others.

In 2012 I published my first book on Zen hunting, entitled, Zen Hunting (eBook now available on Amazon). The idea for this book was first conceived in 2002 after a particularly enlightening hunting trip. It then took ten years to fully understand the magnitude of this new understanding. It was finally materialize in my sprawling, 200-page book about the meaning and purpose of life!

For today, just remember one thing: hunting is more art than a science In order to achieve the greatest success in hunting, you must be willing to expand your consciousness beyond just the killing and the gear.  My mission is to help people along this path.

As this post is now in peril of running amuck, I will digress. Stay tuned for regular postings and please comment or pose questions for me, Thank you for reading!

Below is a short excerpt from my book:

July

There’s a certain point in mid-July when everything begins to change. Midday shadows grow longer, inch by inch, day by day. The slightest change in the earth’s angle to the sun is detected deep inside of me and stirs my whole being. A switch is flipped and my senses sharpen with anticipation for something great. The air and the ground comes to life as if charged with an electrical current which flows through all things, and through me, then out again, bringing all of life into focus and oneness.

By August, the weather is hinting of fall and the great harvest. Afternoon gusts of dry, hot air carry with it nostalgic aromas of ripening vegetation that will accompany me into the depths of the woods and back into the womb of Mother Nature.

Archery, Zen, and Hunting